
Hey! This guide is outdated!
I'm no longer actively maintaining this page (but will fix it for obvious problems)...so do not follow it step-by-step. Many of the exact steps may no longer work due to changes and updates to software. I would never be able to keep up with the pace of change anyway, so you will have to get used to searching for the latest instructions anyway. An excellent guide that has worked for me and others is Moncef Belyamani's exhaustively detailed and illustrated guide.
Another note: Ruby 1.8, which is still the default version of Mac OS X (until Mavericks), is considered to be officially deprecated. Look for instruction guides on how to install Ruby 1.9.3 or 2.0...though for the purposes of this book and most of its exercises, the code will be the same.
Depending on your operating system and the state it is in, installation may either be the easiest or the most frustrating step.
I provide a basic walk through for Windows and Mac OS X users but I really won't know what works for your particular setup (if you're on Linux, I assume you're tech savvy enough to navigate any installation hiccups on your own).
Troubleshoot First
Installing Ruby wasn't painless for me a couple years back when I first tried out the language. The one-step installers have come a long way since then, but you still might run into a few problems.
From here on out, this will be your most powerful troubleshooting technique:
- Copy and paste your error message into Google, or Bing, Lycos, whatever your Internet guide of choice is.
- If that fails, present the query as a question on StackOverflow
I'm happy to attempt to answer questions by email, but it would just be a delayed and abridged version of the above. It's important to get used to doing your own tech support, though. Not out of the spirit of rugged digital individualism, but just because it's so easy and effective these days.
The Command Line
If to this point, your experience with computers has been entirely limited to double-clicking icons to open webpages and Microsoft Office programs, then this next part will seem similar to when Keanu Reeves discovered the Matrix.
Below is a screenshot of the folder listing as seen in Mac OS X (similar in concept to any Windows system). Below it is a screenshot of the Terminal app (in Windows, it's called cmd.exe), where I can execute commands from the command line. I entered the command ls, and the Terminal responded by listing the system folders:
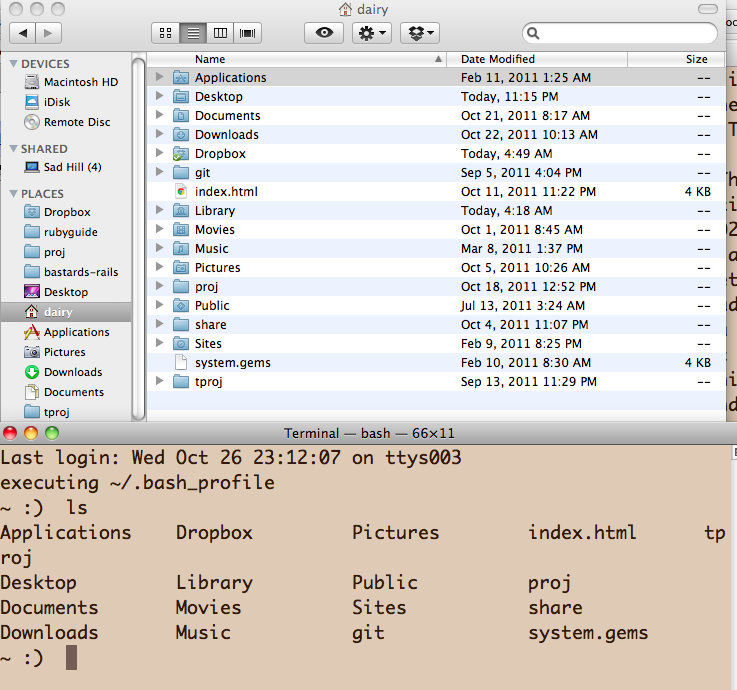
If I were to type in cd Downloads at the prompt, it would bring me to the same spot as if I had double-clicked on the Downloads folder icon. If I were to type in rm *.doc, it would be the same as if in the graphical view of the Downloads folder, I sorted by file type, selected all the files with the extension of .doc, dragged them into the Trash bin, and then emptied the Trash.
This isn't programming. This is just me doing things in the layer underneath the pretty icons and click-and-drag interface that we are accustomed to when working with modern computers.
But this is what programming feels like: using a set of given codes, syntax, and symbols to have more direct control of our data. What we sacrifice in convenience and prettiness, we (hopefully) make up for with more hands-on and specific functionality.
For now, you just need to know how to get to the command line so you can enter in a few commands to set up your programming environment. Don't worry about whether or not it seems intuitive at this point (it won't be).
| Mac OS X | Windows |
|---|---|
| In Finder, go to the Applications»Utilities folder | Click on the Windows menubar button, and select the Run... option. Or, hit Ctrl-R |
| Open the Terminal.app | Type in cmd |
| A bland program window should open up. | A bland program window should open up. |
| Type in ls and hit Enter. | Type in dir and hit Enter |
| A file listing should appear. Congratulations, you've learned how to list files in a directory from the command prompt. | |
| Make a shortcut to the command prompt by dragging the Terminal app to your dock | Make a shortcut to the command prompt by creating a shortcut on your Desktop linking to cmd.exe. |
You can leave the command prompt window open for now, we'll go back to it in a bit.
Installing Ruby
This is one area where Google and Stack Overflow are much, much better resources than my limited knowledge. I can only vouch for what has worked on my relatively clean, conflict-free operating systems.
http://www.ruby-lang.org/en/downloads/For Mac Users: If you are on Mac OS X 10.5+, I recommend going through the slightly more complicated steps in the Homebrew section
| Mac OSX | Windows |
|---|---|
|
If you're on 10.5 (Leopard) or better, congratulations, your operating system should already have a good enough version of Ruby (1.8.7+) installed. |
RubyInstaller.org's packages seem to work well with people I've taught. I've installed it on my netbook without issues. Go to the Download page here |
| Check out the Homebrew section below for more advanced installation procedures. | Choose one of the installers. This book was written with my knowledge of Ruby 1.8.7, and the code is general enough that there aren't too many differences between it and Ruby 1.9+ |
Using Homebrew (OSX 10.5+)
If you're comfortable with the Terminal, then I recommend trying out Homebrew (the "missing package manager for OS X"). You may have heard of MacPorts or Fink; Homebrew is in the same category, but I've had an easier time with it. The official instructions are here but I'll try to sum them up:
-
Install Xcode.
This is Apple's developer suite. It's about a 4GB download, 1% of which is relevant to what we need to get Homebrew working. You can either pay $5 for version 4.0 in the AppStore, or download Xcode 3 for free. I think it's still free for non-paying developers, you still have to create a free Apple account if you haven't already done so through iPod/iPhone/iPad usage. -
Run this script.
You can just copy and paste the following line into Terminal, which will execute the script automatically (read my note below it first).Note: Please check the official Homebrew homepage for whatever the latest installation instructions are: http://brew.sh/
ruby -e "$(curl -fsSL https://raw.github.com/mxcl/homebrew/go)"
Note: This is a well-trusted, careful script that walks you through the steps and asks for your confirmation. But generally, you should never just copy-and-paste something that's going to run a bunch of code on your system without reading the script and double-checking that it isn't malicious.
- In the command prompt, enter:
brew install ruby
Homebrew is great for installing just about every software package that you'll use later on, such as MySQL, Git, and ImageMagick. It's all the same simple procedure:
brew install git
brew install mysql
brew install imagemagick
Optional: Ruby environment managers
If working from the command-line is old hat for you, then I highly recommend going the full distance and installing Ruby Version Manager, which you can kick off with:
brew install rvm
The RVM homepage has all the other instructions for you to follow. Basically, it allows you to manage multiple installations of Ruby and its libraries painlessly...something that isn't that important until you're developing and deploying full-fledged web apps (which we won't quite get to in this book).
Note: There's also a competing Ruby manager called rbenv. I haven't used it yet but it has gotten rave reviews on Hacker News and may better suit your system.
Testing Your Ruby Installation
In either OSX or Windows, enter this into your command prompt:
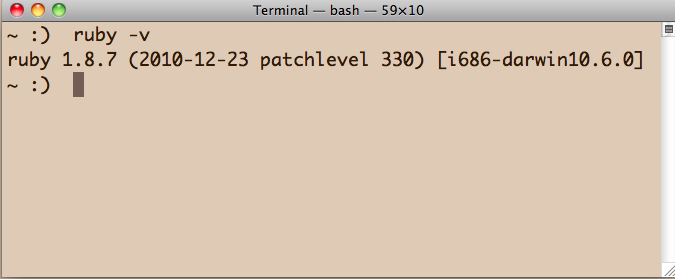
ruby -v
This runs Ruby with the version flag, and simply outputs the version of Ruby that is running on your system. This is what I get on my OSX 10.6 system:
ruby 1.8.7 (2010-12-23 patchlevel 330) [i686-darwin10.6.0]
If you get anything besides an error message, you're at a good spot.
Write and Run Your First Program
You have Ruby installed...now what? If you've never programmed before and have never opened a computer program without a double-click, you're probably still wanting to know:
This is fun, but how the hell do I even actually run a Ruby program? Where would I even write it?
Now for some instant gratification:
Trying out the Interactive Ruby Shell (irb)
The interactive Ruby shell – irb, for short – is a program that runs in your system's command-line . But instead of typing in system commands, you type Ruby commands.
When you start irb, it uses the same window as the command-prompt in which you started irb. This can be a little confusing because the command-line – i.e. Terminal for OSX and cmd for Windows – and the irb prompt look nearly indistinguishable from each other.
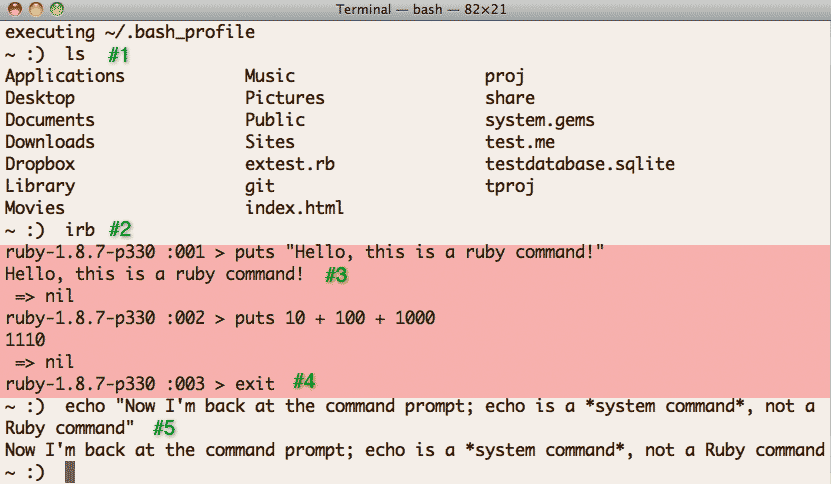
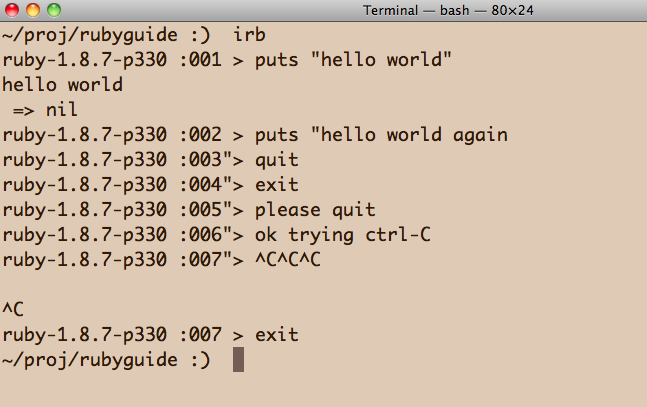
To make things a little clearer before you try irb yourself, here's a diagram of my Terminal in which:
- I execute system commands, such as ls to list directory files
- Then I start irb by typing "irb" at the command prompt
- With irb started, I execute Ruby commands.
- I quit irb by typing exit and hitting Enter.
- That kicks me back to the command prompt. I type another system command to confirm this.
These steps are labeled in the graphic below. The red background represents the part when irb is active; everything else is when I'm operating in the OSX command-line:
So now try irb for yourself:
- Open up your command prompt (either cmd or Terminal)
- Enter irb at the command prompt
- You should see a new kind of prompt – you are now in the interactive ruby shell. It may look similar to the command prompt, but it's an entirely different program environment with its own commands. It should look something like this:
ruby-1.8.7-p330 :001 >
- ruby-1.8.7-p330 – This is the version of Ruby being used. Yours may differ.
- :001 – This indicates what line we're on, for reference's sake. Since we just opened irb, we're at the first line.
- > – The end of the prompt. Everything you type shows up to the right.
- At the irb prompt, type:
puts "hello world" - You should see a response from irb that looks like:
ruby-1.8.7-p330 :001 > puts "hello world"
hello world
 => nil
Congrats! You just wrote your first Ruby script and executed it. Sure, it's just one line. But now you know easy it is to write and run a command in Ruby.
The rest of this book is just learning more commands and how to best arrange them to do some real work.
How to get out of irb
To go back to your operating system's command line. Type in:
exit
And your will should be done. If not, irb may think you're in the middle of a long code block or string, which can happen if you didn't close a statement properly with quotation marks, parentheses, or braces. Just hit the key-combo Ctrl-C a couple of times, hit Enter, and then type in exit.
You are now back at the command line. This is where you enter UNIX/Windows commands to change directory (cd), list files (ls/dir) and launch irb (irb), the interactive Ruby prompt from which we just exited.
Sorry, just pounding the point home. To many beginners, the command line and irb prompt look the same. Once in awhile, I'll accidentally type in Ruby code at the command line instead of irb. No harm done, it just spits out an error message.
Get a Text Editor Designed for Coding
As you saw in your first programming script, the code for a Ruby program is just the text you type. The Ruby interpreter then reads that text and acts on it.
The interactive Ruby shell is nice for typing quick scripts. But when you need to write more than a dozen lines of code and you plan on revisiting and re-editing it, it's best to program inside a text editor with programmer-friendly features.
| Mac OSX | Windows |
|---|---|
|
Bare Bones Software has a fully-featured free text-editor called TextWrangler. If you don't want to shell money out yet for a text-editor (Bare Bones sells its BBEdit for $99. I personally use MacroMates TextMate), TextWrangler will keep you going for awhile. |
I don't program in Windows, but ScITE (SCIntilla based Text Editor) is free and seems to work without too much fuss. |
You can download it from their site or from the Mac App Store. |
The download page is here. Download the zip file. |
|
The App Store version should automatically place the TextWrangler icon in your dock. If you're using an installer package, just drag it into Applications and then onto your dock, as you would any other installed program. |
Wherever you downloaded the installer (hopefully, your Downloads folder), just double-click it and it should install in a directory such as C:\SciTE. Run the .exe file |
You can also try out gedit, a simple but powerful (and free) text editor that is available for Linux, Mac and Windows. It takes a few extra steps to get it to run Ruby scripts with a keystroke, and it doesn't have the exact look and feel of standard OSX or Windows apps. But it does the job quite well.
How to Run a Program in Your Text Editor
After installing Ruby, this part seems to be where many beginners stumble : How to write a program inside a text editor, where it gets saved to, and how to execute it.
I'll walk through those steps for both Windows and Mac OS X.
Jump to the Windows-specific instructions
For Mac OS X and TextWrangler
If you bought it from the App Store, then the TextWrangler icon will be in your Dock.
Otherwise, if you downloaded it from the site, go to your browser's download folder, wherever that may be. You can go to the Window menu of your browsers menubar and there should be (at least in Safari and Chrome) a Downloads folder item.
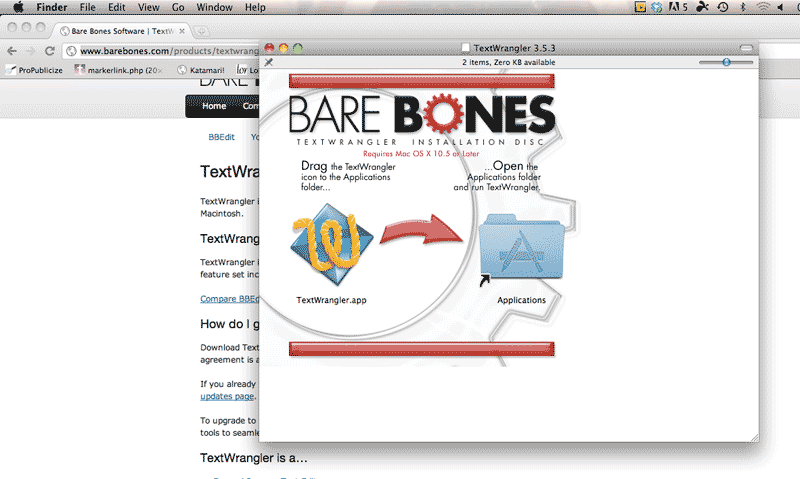
Double click on the TextWrangler_3.5.3.dmg file (it might have a different version number) and it should pop open a new window telling you to drag the TextWrangler icon into the Applications folder. Do so.
No matter how you installed TextWrangler, there should either be a folder or a TextWrangler.app in your Applications folder. You get to the Applications folder by going into Finder (which can be found on the Dock.)
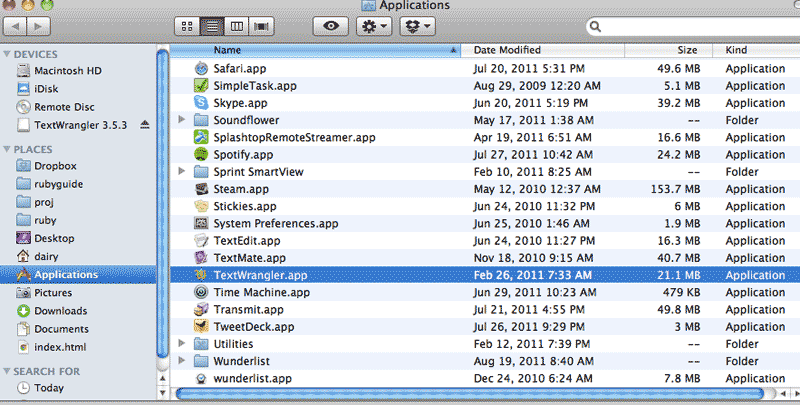
Double-click the TextWrangler.app (or click on it from the Dock) to open it.
After opening the app, it should pop open an empty text window. This is where you type your code. You can expand upon the puts "hello world" script but don't get too fancy yet.

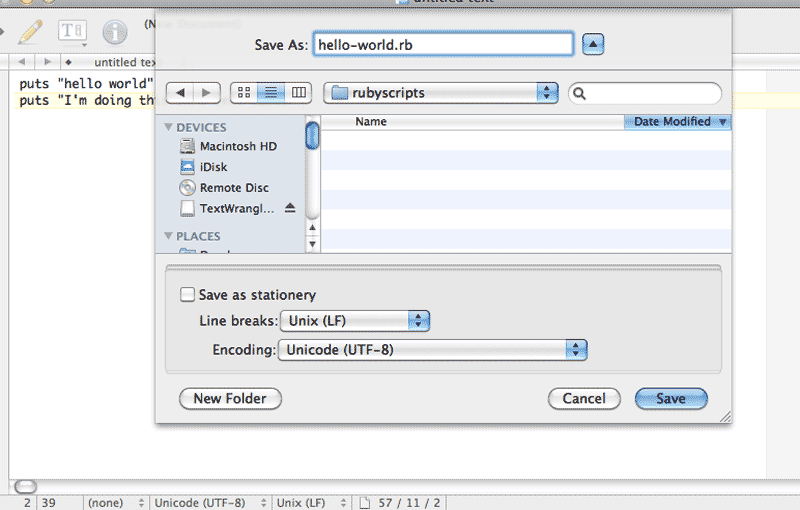
Either go to File»Save. Or, start building the good coding habit of using keyboard shortcuts: Cmd-S. It should pop open a window asking you to name the file.
Before you do that, click on the little down arrow next to the "Save As:". You should see the standard Mac file listing.
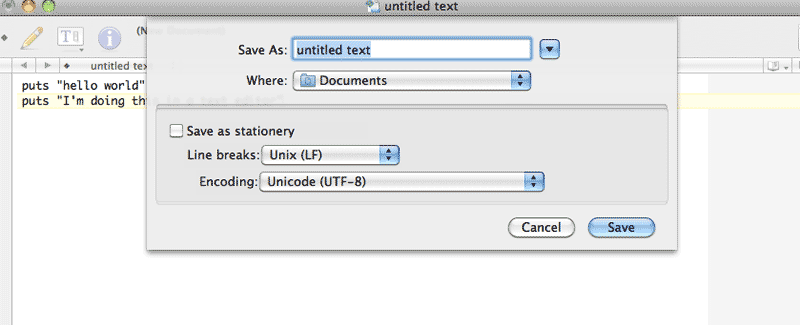
Make a new folder somewhere, anywhere. You can make a subfolder in Documents called rubyscripts
Now type in the filename. Name it whatever you want – I called it hello_world.rb. For simplicity's sake, just you alphabet letters and underscores; no hyphens for now.
The important part is to save it with a .rb extension.
After saving it, you should notice that the code you typed in is now colored. Saving it as a .rb allows TextWrangler to know that you're writing a Ruby script, so it colors the code accordingly.
On the far right of the TextWrangler menubar, you should see a #! menu item (this is called a shebang, in case you were wondering). Open that menu and select the Run option.
A new text window should pop up. This is the output (anything that you put in quotes after the puts command) of your program.
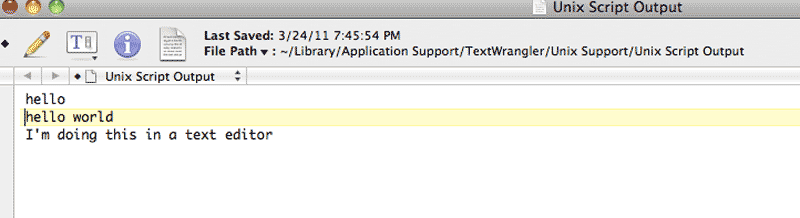
Congratulations. You just ran your first program through a text editor.
There's no magic here. TextWrangler is just combining a few tedious steps for you, including printing the output to a textfile so that you can save later.
The next step below walks you through those tedious steps:
This is a bonus optional step to give you a better familiarity with your system.
Pop open a Terminal window. If you saved the file in Documents/rubyscripts, this is what you type in to change to that directory:
cd ~/Documents/rubyscripts
The command cd stands for "change directory". That tilda ~ symbol is a shortcut for your user home directory. If you saved your file in a folder such as Documents, that folder lives in your user's home directory, because every user has folders for Documents, their Desktop, among other things.
The official full name of that directory, if your username is dnguyen, would be:
/Users/dnguyen/Documents/rubyscripts
Sometimes you'll forget where you put a file and the text-only Terminal won't be as easy-to-navigate as a GUI directory window. To list the directory's contents, type in:
ls
Hopefully you see hello_world.rb (or whatever you named it) on the list.
Finally, type in the following command to execute your script:
ruby hello_world.rb
If you followed all my steps above, your Terminal should look like this:
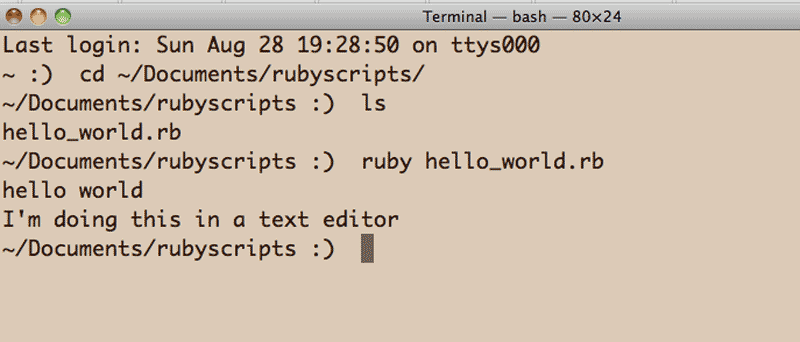
Congrats, you've just run your first few UNIX commands and run your program from the command line. It's not hard, but it's bewildering if you've never worked in Terminal.
I almost never run scripts in Terminal. Doing it through the text-editor is good enough for most cases. But I just wanted to demystify the process for you. Again, don't worry about memorizing UNIX commands yet, you'll end up learning them through familiarity and a need-to-know basis.
Jump to the Mac OS-specific instructions
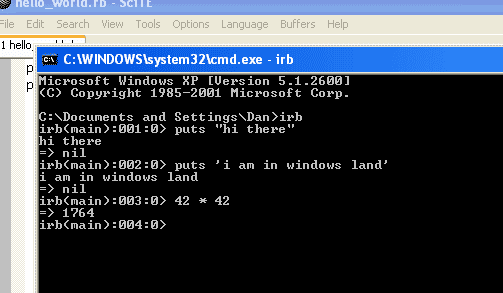
Windows and SciTE
I've run through these instructions on my Windows setup. But as I now work almost entirely in Mac OS X, I may be missing some nuances here.
Use Windows Explorer or the Search tool to find the scite.exe file:
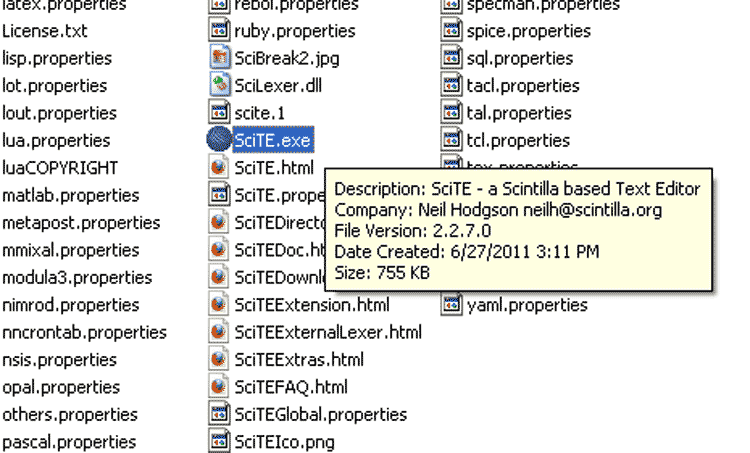
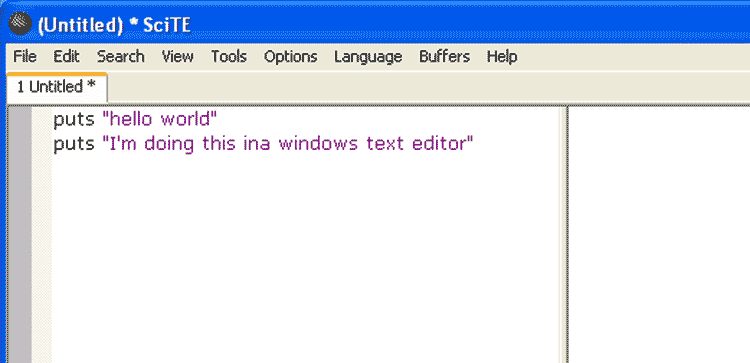
Double-click the file to open it and a text-editor window will appear.
Type some code into the text-editor window. You can expand upon the puts "hello world" script but don't get too fancy yet.
Either go to File»Save. Or, start building the good coding habit of using keyboard shortcuts: Ctrl-S. It should pop open a window asking you to name the file.
Before you do that, create a new folder. In the example below, I've named it "rubystuff":
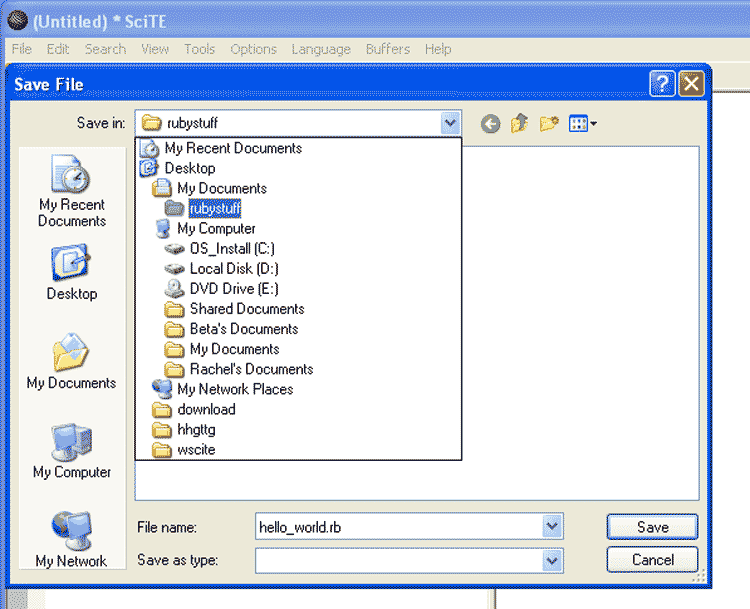
Now type in the filename. Name it whatever you want – I called it hello_world.rb. For simplicity's sake, just you alphabet letters and underscores; no hyphens for now.
The important part is to save it with a .rb extension
.After saving it, you should notice that the code you typed in is now helpfully colored. Saving it as a .rb allows SciTE to know that you're writing a Ruby script, so it colors the code accordingly.
On the right part of the SciTE menubar, you should see a Tools menu.
Open that menu and select the Go item. You can also use F5 as the keyboard shortcut.
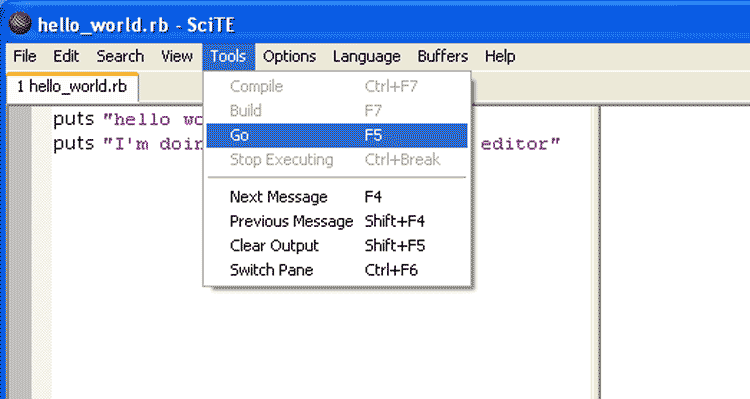
A side panel should pop up. This is the output (anything that you put in quotes after the puts command) of your program.
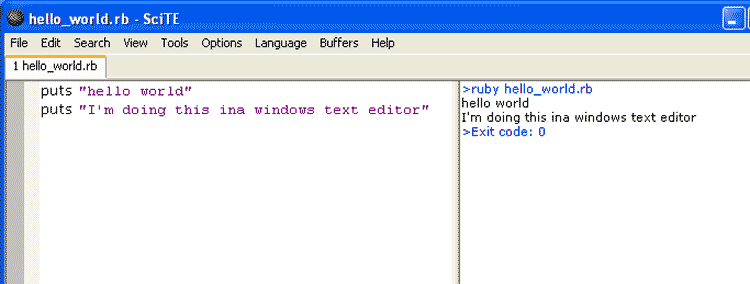
Congratulations. You just ran your first program through a text editor.
There's no magic here. SciTE is just combining a few tedious steps for you, including printing the output to a textfile so that you can save later.
The next step below walks you through those tedious steps:
This is a bonus optional step to give you a better familiarity with your system.
Pop open a command-promopt (cmd.exe) window. If you saved the file in My Documents/rubystuff, this is what you type in to change to that directory:
cd "My Documents"\rubystuff
Sometimes you'll forget where you put a file and the text-only command prompt won't be as easy-to-navigate as a GUI directory window. To list the directory's contents, type in:
dir
Hopefully you see hello_world.rb (or whatever you named it) on the list.
Finally, type in the following command to execute your script:
ruby hello_world.rb
If you followed all my steps above, your Command Prompt should look like this:
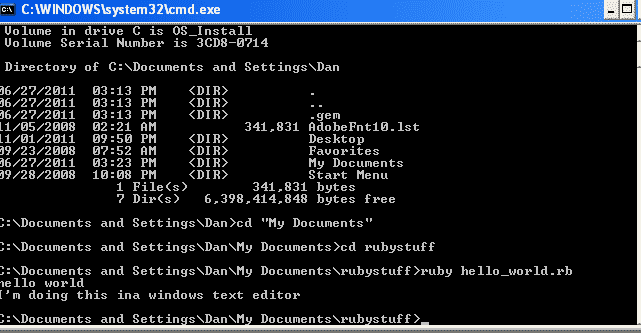
Congrats, you've just run your first Ruby program from the command line.
I almost never run the scripts on the command line. Doing it through the text-editor is good enough for most cases. But I just wanted to demystify the process for you. Again, don't worry about memorizing Windows command prompt syntax yet, you'll end up learning them through familiarity and a need-to-know basis.
Running code, step-by-step
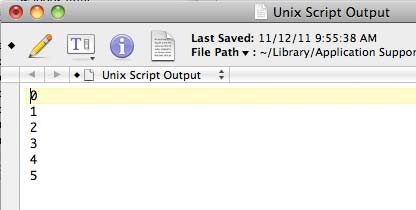
Some text editors, including TextWrangler, will only show you output at the end of the program's execution. If the program takes awhile to run, you may be staring at a blank screen for awhile without any idea of how things are going.
Copy-and-paste and Run the following example code in your text-editor:
6.times do |num|
   puts num
   sleep 0.5
end
It might be a few seconds before you see the output all at once:
In TextWrangler (the option may be differently-worded in other editors), choose Run in Terminal:
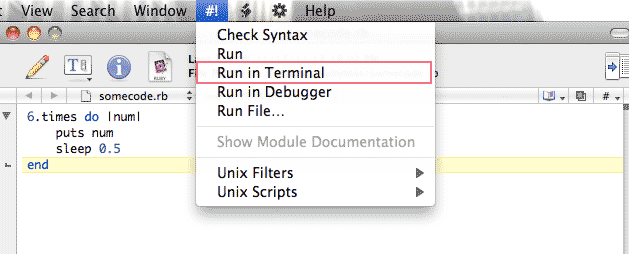
You should see the output update in real-time, instead of all at once:
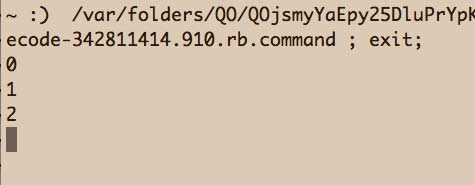
For longer scripts, this will probably be the preferred method of executing scripts.
The convenience of a text-editor
Using a text-editor confers two major advantages:
- You won't need to go to the command prompt (as much). You can type the code, save the text file, and execute Ruby, all from the text editor window.
-
Color-coded text. Compare the "hello world" one-line scripts as typed in irb:

To how it looks like in your specialized text editor:
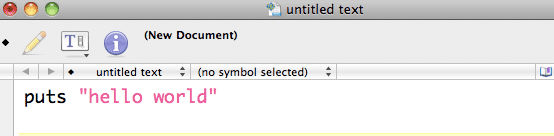
Notice how the "hello world" is colored differently than puts. The latter is a Ruby command that prints to screen; the former is the datum you're printing. When writing a large program, color-coded text is
very helpfulessential to distinguish between the two (and other types of code conventions) at a glance.
Executing Ruby scripts from the command-line
If you followed the pedantic how-to-run-a-script-from-the-text-editor section, we covered this step.
Let's say you don't want run Ruby code through irb or one of the vouched-for text editors. Fine. Ruby code is just a text file. Type in some code, save it as whateveryourfilenameis.rb. Then go to the command prompt and type:
ruby whateveryourfilenameis.rb
This is essentially what the aformentioned text editors do for you with a keyboard shortcut. But if you want to exercise your fingers, go ahead and run your scripts this way.
Troubleshooting
The error messages that Ruby will throw your way are daunting, even when you become more experienced. The trick is to break down each message into each of its components.
Most of the code and error messages will be unfamiliar to you. Good. The point of this exercise is to test your abstract thinking process. Until you reach code-deity status, programming will involve a lot of encounters with code you won't recognize, particularly since you will often work with other people's code.
Here's a line of code I typed into irb
ruby-1.8.7-p330 :001 > 9 + fx_summation_k
- ruby-1.8.7-p330
- Inside of irb, this is a prefix before each line of code you manually enter in. In my case, it merely states the version of Ruby that I'm running.
- :001
- This number represents the current line number. Each line you type into an irb session will increment this counter. This is a useful number because in an error message, Ruby will point you to the exact line where the error takes place. This is also the case if you run your code from a text-editor.
- >
- This is the prompt; everything to the right of it is actual code.
- 9 + fx_summation_k
- This is the part I actually typed in.
You can follow along by typing 9 + fx_summation_k into irb and hitting Enter.
You should get an error message like this:
   NameError: undefined local variable or method `fx_summation_k' for #<Object:0x1001dd2a0>
      from (irb):1
Let's break that down from the perspective of someone who just copy-and-pasted in his/her very first line of someone else's Ruby code:
- NameError:
- This is not a real English word, but it appears to be some kind of Ruby term, possibly describing a category of error. Let's note it and move on for now.
- undefined local variable or method
- This looks like real English. But the nouns "variable" and "method" seem to be programming terms. But "undefined", that seems pretty straightforward. Ruby is unhappy because a variable or a method – whatever those are – isn't properly defined.
- `fx_summation_k'
- This word is actually part of that code line we entered. Apparently, `fx_summation_k' is either a variable or a method. And it is undefined.
- for #<Object:0x1001dd2a0>
- This looks like more Ruby gibberish. Moving on....
- from (irb):1
- The irb obviously comes from the fact that we're using irb to enter code. And that 1 seems to correspond to the 001 when we entered the line of code. So this bit seems to indicate where in our program the error lies (which is pretty self-evident, given that we've only entered one line of code in).
So, without even knowing very basic Ruby terms, such as "variable" and "method", we can at least guess that Ruby has a problem with line 1 of our code and it has something to do with the term fx_summation_k – which is either a variable or a method – being undefined.
That's actually does sum up the problem. But assuming you're too new to programming to know how to fix it, try to enter the error message into Google:
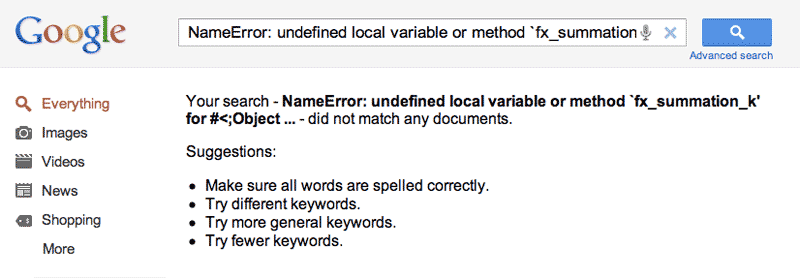
It looks like no one in the history of the Internet has had our exact problem. However, this is because we included terms specific to our system and code. Below is the same error message, but I've bolded the unique parts of it:
NameError: undefined local variable or method `fx_summation_k' for #<Object:0x1001dd2a0>
      from (irb):1
The line number of the code and that strange <Object> thing seem to be dependent on our specific environment. As for fx_summation_k, that may be something unique to this code excerpt. Let's focus on what seems to be the general error message:
NameError: undefined local variable or method
So if we enter the non-specific terms into Google:
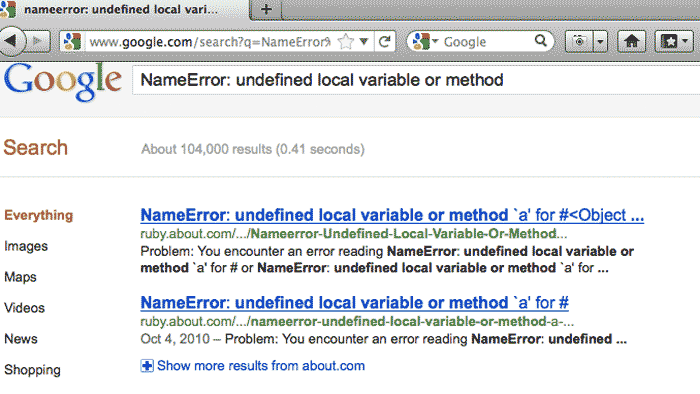
Debugging programs and deconstructing error messages is a matter of taking a deep breath, accepting what you don't know (yet) and starting logically from what you do know. If a Google search doesn't bring up a useful answer, create an account on StackOverflow.
StackOverflow is a massive community devoted to helping each other out with programming problems. There has been no question I've had that was so specific that no one stepped up to offer help. Oftentimes, a StackOverflow thread will be the first result for a Googled error message.